This section assumes you have gone through the tutorial. The following is a minimal example of creating a nbdev project from scratch, with some commentary around why certain things work the way they do.
For this example, we will use code from Allen Downey's excellent book, Think Python 2, particularly the Card module. We will not cover all the features of nbdev as we focus on providing you with just enough information to become productive. We recommend reading the rest of the docs when you are done with this example.
Per the instructions in the tutorial, we will make a new repository using the template. In this case, we make a repository called deck_of_cards:
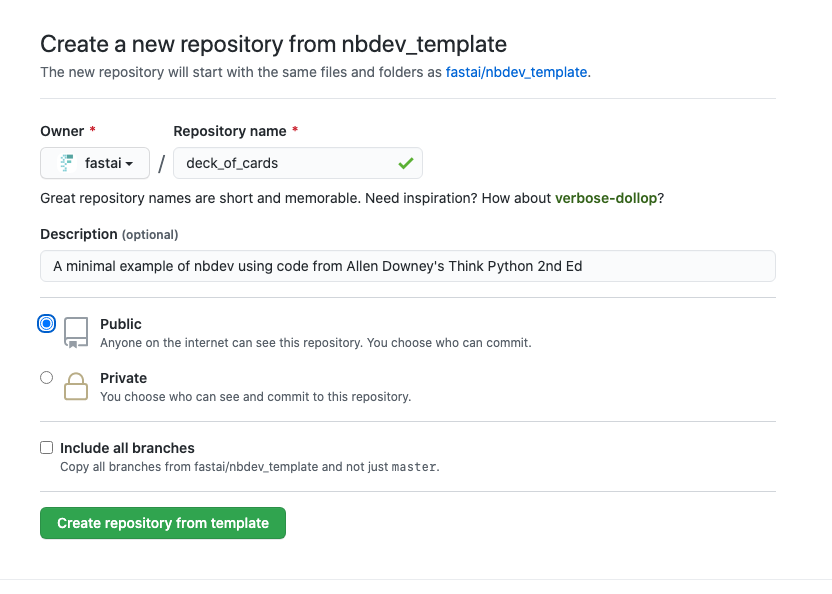
After you do this, you will have a repo with the necessary files to get started. You should also setup nbdev and install the githooks per the instructions in the tutorial.
Step 2: Modify Configuration Files
Edit settings.ini
Editing settings.ini is required for nbdev to work properly. These settings are used to populate required information for you to host documentation on GitHub Pages, as well to publish your modules as packages to pypi.
These are the fields that we changed in settings.ini:
lib_name = deck_of_cards
description = "A minimal example of nbdev using code from Allen Downey's Think Python 2nd Ed"
keywords = nbdev
author = Hamel Husain
author_email = [email protected]
copyright = Hamel, inc.
user = fastai
- The
authorandauthor_emailfields are read by setup.py for python packaging. - The
lib_nameis used by both by setup.py and Jekyll's configuration file, _config.yaml to make sure the rendered docs are configured correctly on GitHub pages.
Next, we take the Card module from the ThinkPython2 repo and write it in nbdev.
The first step is to copy and paste the Card class from Card.py into a new Jupyter notebook, which we have named 00_card.ipynb. Copying and pasting code from python files is a reasonable way to convert existing python scripts into Jupyter notebooks. A useful trick for copying big blocks of code into notebooks is to copy the whole file into a single cell and use ctrl-shift-minus to split the code into separate cells.
If you are trying to convert an existing python project to nbdev, we recommend incrementally converting specific files to nbdev over time. Specifically, we recommend choosing one python file to begin with like the example with card.py shown below.
# default_exp card
In this case, the argument card specifies that code exported from this notebook will be placed in the destination card.py by default. You can read more about how python modules are created from notebooks here. A reasonable way to arrange the notebook will be like this:
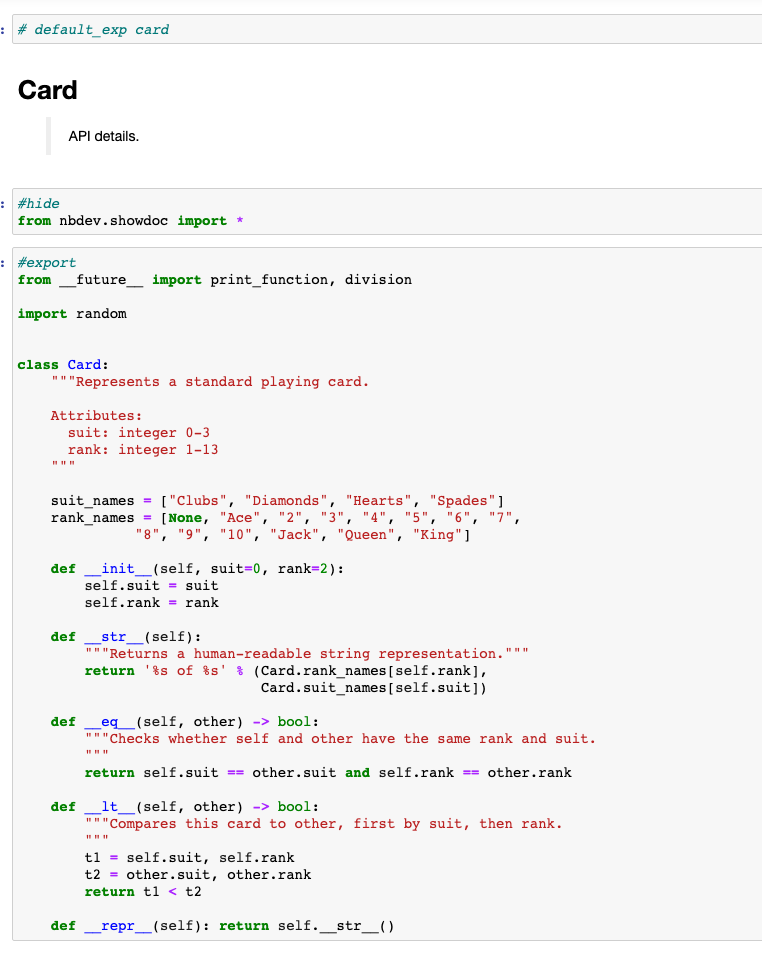
Flags
nbdev uses special comments, or flags, as a markup language that allows you to control various aspects of the docs and how code is exported to modules, and how code is tested. In addition to default_exp, the the following other flags are present in this notebook:
#hide
#export
export, this defaults to the module specified by default_exp as described above.Where The Magic Happens: Write Documentation And Tests
In the original code base, tests for Card are separate, located in Card_test.py. Furthermore, the documentation for Card is primarily located in the book folder of Allen's repo as well as some documentation in the docstring. While this is a typical arrangement for a Python project, we believe nbdev can make your workflow easier by organizing the docs, tests and source code into a single context. We believe this allows developers to write higher quality documentation and code, and encourages more testing.
Here is what the documentation + code looks like for Card:
These comments and tests are rendered by the documentation system which is discussed in a later section. Furthermore, the assert statements automatically become tests that are run by the continuous integration system setup by default in nbdev in your GitHub repository.
nbdev repositories require a notebook named index.ipynb, which is included in your repository when you use the template. index.ipynb serves two purposes:
- It becomes the README for your repo (this notebook is converted to
README.md) - It becomes home page (
index.html) for your documentation.
You will notice the following boilerplate in index.ipynb:
from your_lib.core import *
You should remove this line of code or comment it out, as it will cause a syntax error. Later, when you are finished creating your module, you can replace this with the appropriate import statement. We left this line in here on purpose so that you can experience how the continuous integration system (discussed above) warns you of errors.
Step 4: Convert Notebooks To Python Modules & Docs
Run the command nbdev_build_lib from the root of the repo. This exports notebook cells tagged with #export to the appropriate python module. For example, the notebook 00_cards.ipynb gets converted to card.py.
Run the command nbdev_test_nbs to run the code and tests in all the notebooks. This command also gets run by the continuous integration system setup for you by nbdev, but it is useful to run these tests locally to get immediate feedback.
Preview The Docs
To preview the docs, run the command make docs_serve from the root of your repo. This command runs the CLI command nbdev_build_docs behind the scenes for you, which generates a documentation site from the notebooks. After running this command, you will see a URL in the terminal indicating where the docs have been hosted locally. For the fastai/deck_of_cards repository we are using for this example, the url is http://127.0.0.1:4000/deck_of_cards/
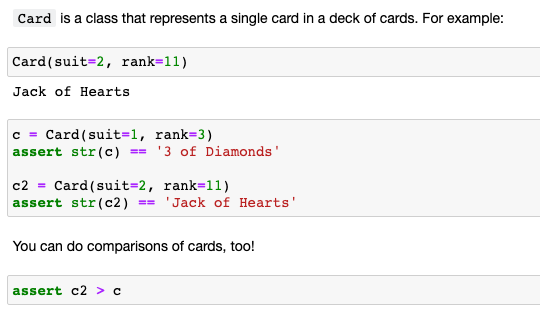
If you navigate to the cards page at http://127.0.0.1:4000/deck_of_cards/card.html, you will see the docs that we just wrote, which we have annotated for further explanation:

Explanation of annotations:
The heading Card corresponds to the first
H1heading in a notebook with a note block API Details as the summary.nbdevautomatically renders a Table of Contents for you.nbdevautomatically renders the signature of your class or function as a heading.nbdevautomatically adds a link to the corresponding source code (which is a plain-text python file) on GitHub. Remember,nbdevconverts Jupyter notebooks to source code with the commandnbdev_build_lib.This part of docs is rendered automatically from the docstring.
The rest of the notebook is rendered by converting your markdown into HTML, showing the inputs and outputs of each of your cells (including charts and images), and so forth. You can hide entire cells, hide only cell input or hide only output by using the flags described on this page.
nbdev supports special block quotes that render as colored boxes in the documentation. You can read more about them here. In this specific example, we are using the
Noteblock quote.Words you surround in backticks will be automatically hyperlinked to the associated documentation where appropriate. This is a trivial case where
Cardclass is defined immediately above, however this works across pages and modules. We will see another example of this in later steps.
show_doc
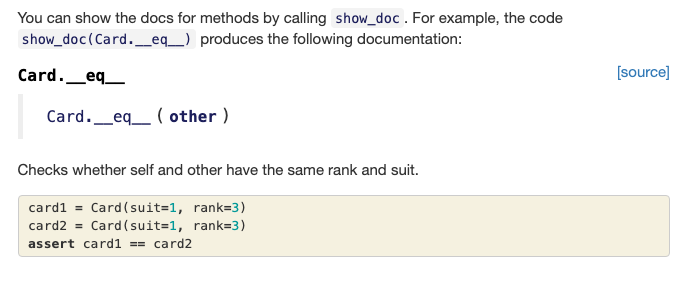
show_doc allows you to control how documentation is shown on the docs. You can control the location, order, heading and other details of how documentation is rendered. You can read more about it here. For example, this is how you can use show_doc to render the docs for the __eq__ method of Card (notice how the tests are naturally included below the documentation):
Important Notes about show_doc:
- For functions and classes,
show_docis called by default automatically in the same location where the function or class is defined. This is why you see a heading for the classCardsin the docs example above even thoughshow_docwas never explicitly called.- You can override this default by explicitly calling
show_docin your desired location.
- You can override this default by explicitly calling
- For methods, you must call
show_docfor a documentation heading to appear, as illustrated in theCard.__eq__method above. This is by design, since unlike functions, you typically define all of the methods for a class in a single contiguous block of code. Therefore,show_docallows you to control both the order and placement of documentation headers for methods which help you write prose and tests for each method organized under the appropriate header. - We recommend experimenting with
show_docby editing a notebook and re-rendering the docs (described below) to see the what happens in different scenarios.
Refresh the docs
If you want to edit the docs, you can make a change to the corresponding notebook(s) and run nbdev_build_docs followed by a hard refresh in your browser to re-render the docs.
This step assumes you have already enabled GitHub pages.
At this point we are ready to push your first files to GitHub. If you have installed the git hooks per the tutorial instructions, nbdev will automatically clean unnecessary metadata out of notebooks to avoid conflicts and overly verbose diffs. Before pushing your files to GitHub for the first time, we recommend running the command git status so you can see all the files generated by nbdev for you. You will notice that the following files were created:
.pyfiles corresponding to the notebooks you created, in a folder corresponding to the library name, which in this case is called deck_of_cards. For example, an__init__.pyfile is automatically created in the proper directory in order to organize a python module.- files for your docs site in a
docs/folder. This directory contains HTML, CSS, and other files that are used for hosting your docs site on GitHub Pages.
Make sure you add all these files to your commit with git add before you push to GitHub, because they are all needed for everything to work correctly.
Pushing your files to GitHub will automatically trigger continuous integration (CI) using GitHub Actions. The CI will automatically perform a number of checks outlined here. You can see the CI process running in GitHub Actions by navigating to the Actions tab in your GitHub repo.
After pushing your files, GitHub will rebuild your docs automatically. You can view the status of your doc build by going to your repository settings and finding the GitHub Pages section under options. When GitHub is in the process of building your pages, it will look like this:

When the page is finished being built, the color and status message will change to look like this:
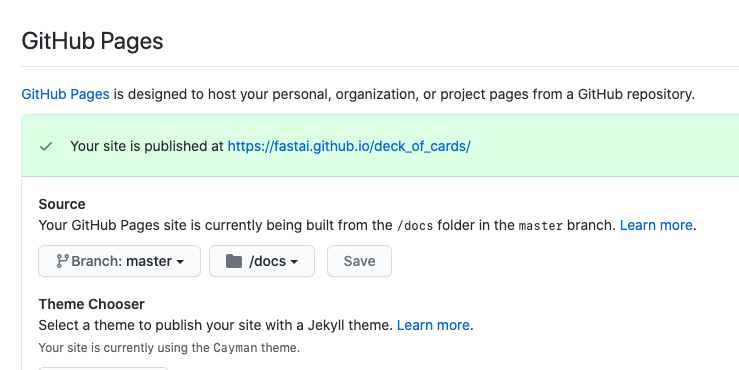
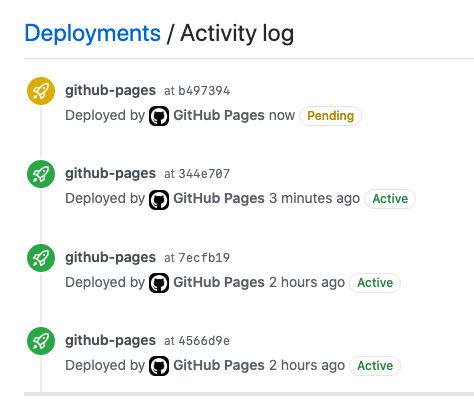
Furthermore, assuming that you have already enabled GitHub Pages, you can see the status of your Github Pages deployments at anytime. If you add /deployments to your repository's GitHub URL you will see a deployments dashboard. For example, below is a screen shot of https://github.com/fastai/deck_of_cards/deployments right after pushing new files:
Step 6: Add More Code
Congratulations, you authored your first piece of code with nbdev! However, to fully grasp how nbdev works, it is worthwhile to add additional code in a new notebook that imports the code you wrote earlier. Next, we will add the Deck class form cards.py into a new notebook called 01_deck.ipynb. This notebook imports the previously created Card class and creates a Deck, which is a collection of Cards:
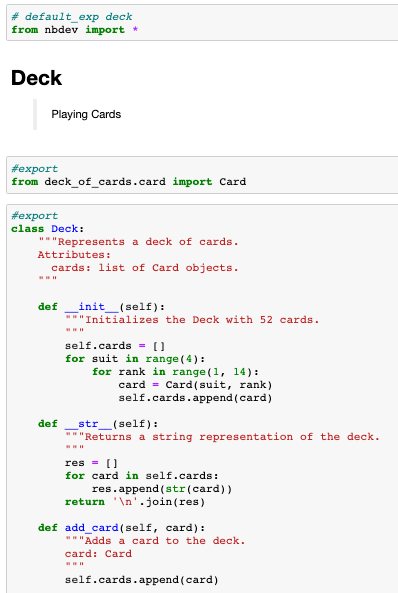
Similar to the previous notebook, the first cell has the nbdev flag # default_exp deck which means that code blocks marked with #export will be exported to the file deck.py by default. You can see that we import the Card object and export that code to deck.py with the following code cell:
#|export
from deck_of_cards.card import Card
This works because the cli command, nbdev_build_lib converted 00_card.ipynb to card.py, which we have imported here.
Tests
Downey's code contains a test for the Deck class in a separate file called Card_test.py. This file is a good example that highlights the strengths of nbdev. The contents of this file is as follows:
"""This file contains code for use with "Think Stats",
by Allen B. Downey, available from greenteapress.com
Copyright 2014 Allen B. Downey
License: GNU GPLv3 http://www.gnu.org/licenses/gpl.html
"""

from __future__ import print_function, division

import unittest
from Card import Card, Deck


class Test(unittest.TestCase):

    def testDeckRemove(self):
        deck = Deck()
        card23 = Card(2, 3)
        deck.remove_card(card23)


if __name__ == "__main__":
    unittest.main()
The code shown above is problematic for the following reasons:
- It is not clear what the purpose of the test is.
- The test is located in a file that is separate from the implementation, so you have to open multiple windows and/or switch contexts to understand the test.
- The tests uses an api,
unittestthat you must learn and think about if you want to write tests. - The tests are separate from the documentation and any prose associated with explaining what the class
Deckdoes.
All of these problems are handled in nbdev, as you can write code, docs and tests all in the same context. Below is a screen shot of the relevant parts of 01_deck.ipynb that expresses the code and this test in a more readable, expressive way:
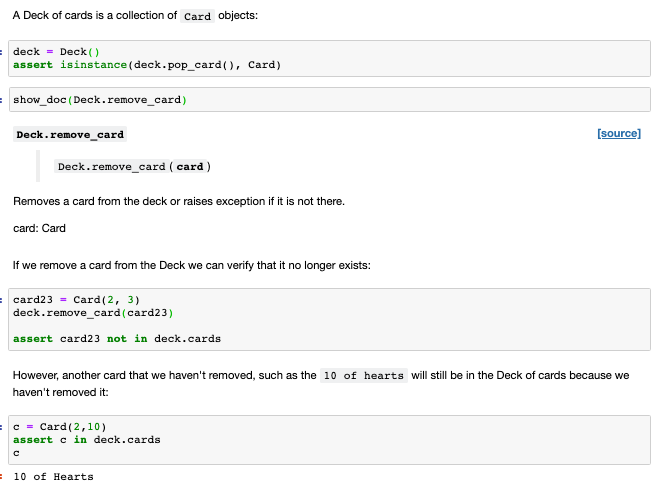
The above code expresses the same unit test, but also integrates documentation alongside the original implementation of Deck. You can view the notebook on GitHub here. One additional tool shown in this notebook is the nbdev function show_doc, which allows you to control the placement of documentation. In this example, showdoc(Deck.remove_card) will create a section in the documentation with an appropriate heading.
If you run the CLI command make docs_serve, you can preview what these docs will look like locally. Below is an annotated screenshot of what this looks like:
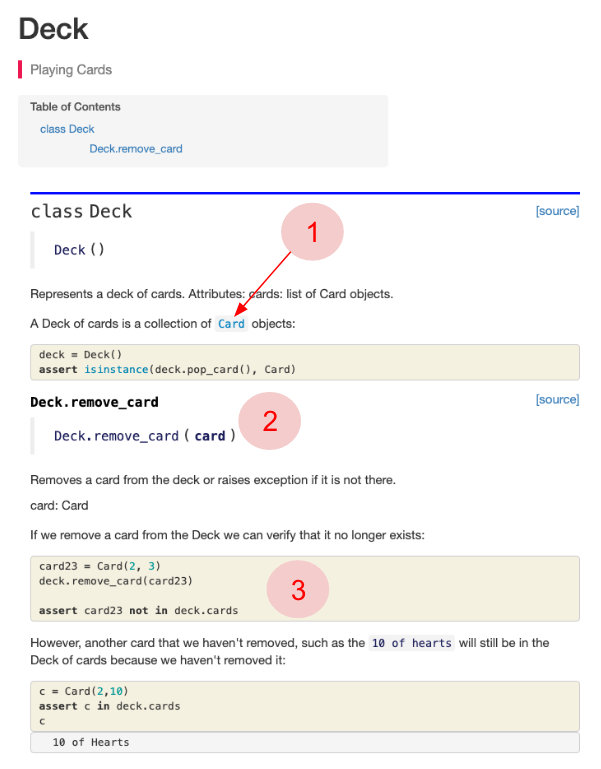
Explanation of annotations:
When writing these docs, we simply enclosed
Cardwith backticks.nbdevautomatically transforms this into a hyperlink to the appropriate page that documentsCard.This heading for the method
Deck.remove_cardwas created byshow_doc.nbdevis designed to encourage you to write your tests as part of your documentation as shown here.
You can see this page live at https://fastai.github.io/deck_of_cards/deck.html.
When you are done make sure you run the following cli commands before pushing to GitHub.
nbdev_build_lib: this converts your notebooks into modules.nbdev_build_docs: this generates the your documentation site.nbdev_test_nbs: this runs all your tests (which is a good idea so you can catch errors).git statusto see which files have changed, which is a good exercise when first getting started withnbdevto understand which files are automatically generated.
You can publish your module to pypi by following these instructions.
References
All the code for this example is available on the GitHub repo fastai/deck_of_cards.
Live Demo
The below video shows a live demonstration of this example, with a Q&A section at the end.